The Battle Weary Bataleon

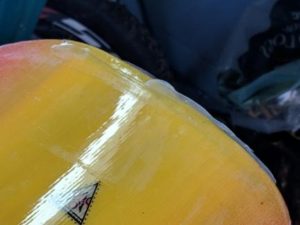
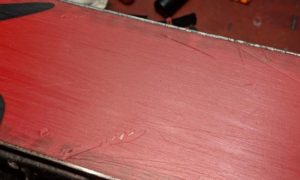
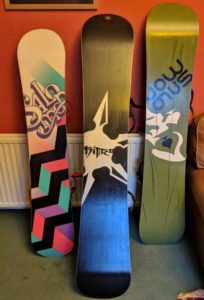
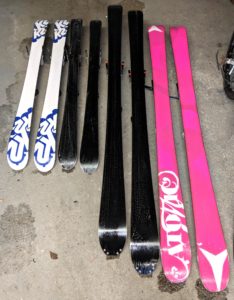
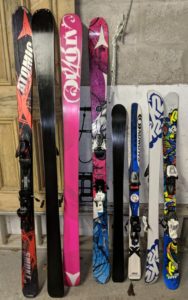
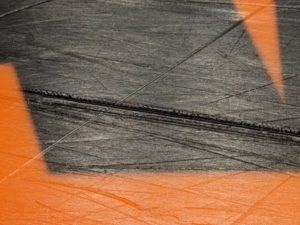
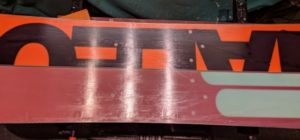
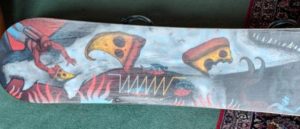
Chris was too embarrassed to drop off his battered board in person so I picked it up from his mum’s place. There was lots of surface damage:

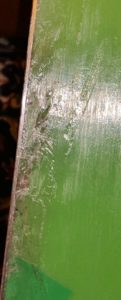
The gouge just left of centre has gone through the P-tex base, the underlying fibreglass and into the core of the board.


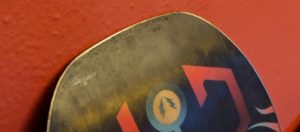
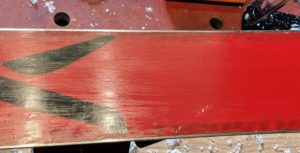
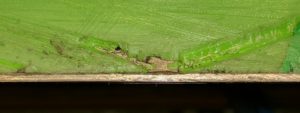
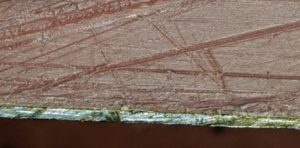
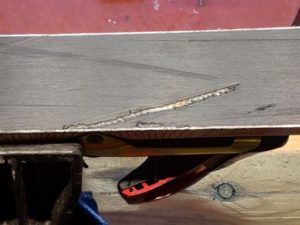
The other gouges are ugly but haven’t penetrated the fibreglass as this one shows:

The gouges tend to have raised edges so they need to be flattened and some of them opened up a little to give the repair P-tex something to stick to.


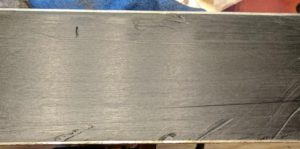
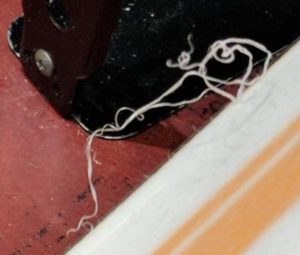
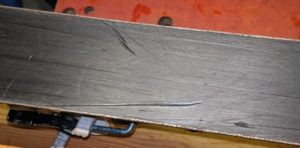
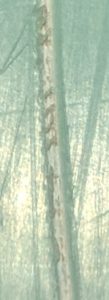
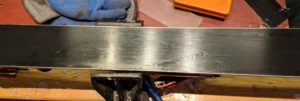
“What about the edges?” I hear you cry. Well not very nice either:

Quite a lot of quite deep scars which are too deep to be ground out entirely.


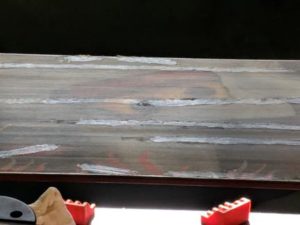
So once the anaesthetist & theatre nurses had been assembled we were ready to go to work. First off the broken ends of the fibreglass have to be cut and the edges of the big gouge smoothed off – both jobs for a sharp penknife. Although in theory the glass reinforces the resin, and therefore this piece of the board sandwich, the loss of integrity of a few broken fibres is neither here nor there so we can sweep along. One the cut is cleaned up it’s good practice to melt some metalgrip into the wound first as it is basically P-tex with a bit of glue and it should adhere better to the underlying layer. Once the metalgrip has had 15 mins to cure it’s time to melt the P-tex in over it – and the two thousand other gouges. Once that’s done the board is probably as ugly as it gets, covered in black & clear plastics:

However the excess P-tex is easily scraped off and soon looks flat but dull. It’s time to structure the base using the Ski-Visions ruby stone for a clean cut, non-hairy base. Obviously the kooky Bataleon 3-D base with its wings & bulges means I can’t structure the base using the ergonomic tool but have to use a bit of broken ruby stone instead. Anyway the base is relatively soft and it’s not a long job. The structure blends the repairs in with the virgin base and gives the base wax something to bite on as well.

Regular readers will know that Bataleon leave their base edges with no bevel, assuming that the kicked up wings on the board do the job of keeping the base edges out of trouble. Which is great until you have to try to grind out some deep scars, and then you realise that there’s no such thing as a zero degree file guide. However, we can reach back into the distant past of Alpine tuning, don a beret, light up a Gauloise and before you can say “Bof!” you’ve wrapped a bit of tape around your mill file and made a 1950’s back street low angle file guide.

I’m not going to pretend that the base edges looked like new afterwards but they are at least out of the woods.

As you can imagine the base drank a gallon of the base renew wax. Once it was scraped the Zoom Universal on top polished up nicely and the board is ready for its next skirmish.


Colin’s Salomons

Colin took some time out of coordinating all of NE Scotland’s cycling activity to drop off his venerable Crossmaxes. They are the classic red white & blue jobbies and had me all teary with nostalgia for the days in the late 80s when all you would see at the Shee were crappy grey Rossi rental planks for the hoi polloi and the posh folks on their Crossmaxes.

Speaking of the Shee one of Colin’s skis had picked up a Glenshee Kiss:

It’s just as bad as it looks. In fact worse in the flesh as WordPress are a bit funny about uploading full fat photos.

Anyway down to the core and also right up to the edge means working in some metalgrip first then topping up to base level with P-Tex. It’s hard to get it absolutely perfect but it came out OK:

You can still see a shadow where the gouge was but it’s flat to the touch and after a few days’ skiing it will blend right in.

Finally a photo of Colin’s finished skis alongside Dave’s superlight Völkl tourers, waiting to be picked up:

Jonny’s bump

Jonny dropped off his K2 board along with his lady friend’s Salomon. Both of them had seen some base ripping action:

Jonny’s base is pretty mashed but most gouges are longitudinal. The photo doesn’t really show the washed out, scratchy white effect that he has managed to achieve. Take it from me it looks very tired.

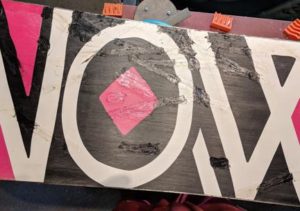
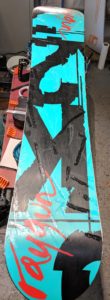
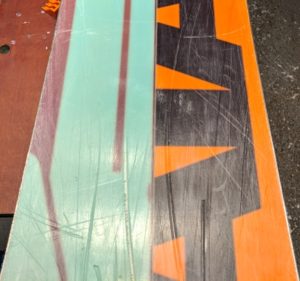
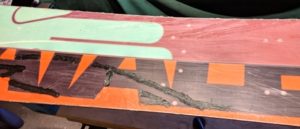
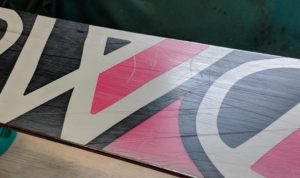
Ms Jonny’s board just has slashes all over it in every direction. As you’ll know by now there are few things more likely to cheer up a tech’s day than having to fill gouges in a black/white/colour repeating base. Here it is with a kilo of repair P-tex in it:

And the next photo shows the base once it has been scraped flat. For once I nailed all the gouges first time and and the base didn’t need a second bite of the base iron to get it sorted:


Still looks dull because the base hasn’t been restructured and there’s no wax yet. However it’s nice & smooth to the touch. And I’m knee deep in P-tex shavings.


Jonny’s board mainly had longways scratches, which normally I leave as they just become part of the structure. However some of them were just too deep to leave so they got some clear & colourless P-Tex:

But Jonny’s main issue is at the end of the board, not the middle. Who knows what the impact looked like but the outcome was a comedy duck bill. Hard to photograph but check out the reflected light on the first snap to get a feel for the degree of bentness:


Now this poses a problem as it is only slightly delaminated and not falling to pieces. If it was more knackered it would be a case of cutting out the P-Tex, bending the edge back, reassembling and gluing. However, it’s not too bad so let’s see if we can just apply Araldite, brute force & wishful thinking:

In order to encourage the edge to roll back into a better angle the top sheet former is actually a spade handle.

It all seemed to be holding at first – here’s the excess epoxy waiting to be cut off:


However the snow gods weren’t smiling on this occasion and the edge managed to pull the scoop back open again, so the edge had to be taught a lesson. Edges are really easy to bend when they’re sitting on the bench – you can easily curl them up if you need to send a few metres to Aberdeen from the factory in Central Europe – but once an edge is glued into a sandwich of four or five layers of wonder material to make a board it all gets a bit harder. Finally the deed was done and the scoop re-glued, but the teeth marks from the various gripping tools can be made out by a discerning eye:

However it is pretty straight, tightly glued up and should withstand all but the roughest handling. As well as having slick, flat, waxed bases & lovely sharp edges, the bases have recovered the original colours that they had in the shop instead of the washed out look:

Priors

Ali dropped off her Rossis and brought Mr. Ali along to hand over his Priors in person. I’ve read about Priors (hand made in Whistler) but these are the first ones I’ve had my gloves on.

First impressions: they share some DNA with DPS skis – nice uncluttered tops & bases, thin, light. Flat. The bases are hard and don’t melt as soon as they see the base doc iron. However, obviously, they could have used proper black P-Tex for the bases instead of wishy-washy blue.

Also, DPS make sure the owner doesn’t need to shave his sidewalls. And they tune the edge by hand before selling them. Prior hand over rather wiggly edges, which resisted all attempts to photograph. They’re sorted now though.

Ali’s Rossi’s were pretty nice but had some existing ham fisted base repairs from a P-Tex candle. Did my best but really it’s best to avoid putting that low boiling point mince into your bases if you can.


Staggering to the exit

Julian dropped off a family of skis before his Easter ski trip. Here they are all shined up:

They look great and Julian can hold his head high in the baggage reclaim area as he drags them to the transfer bus with his wife & kids racing ahead, not offering any support whatsoever (maybe that’s just my family).

However closer inspection reveals that the daddy Völkls are actually on their last legs.

Take a quick look at the base when it arrived at the Cave:

That wee nick only had to dig down about half a millimetre to reach the wooden core. It looks like the Völkl design team cut weight by using skinny P-Tex. The edges are also skinny.

So once the holes are filled and scraped we get a chance to step back and…


Oof! See the black tabs from the edges shining through the P-Tex? You can feel the lumps along the edge. Not much life left there.

Sadly the edges are already disappearing down the side so although we would normally prescribe a base grind to bring everything down then reset the edges there simply ain’t no base left to play with. Tricky.

So I carried on and finished the job but there’s only one more holiday left in these puppies I’m afraid.

Finally, and I’m not pointing the finger here, Julian mentioned that he has an edging guide & file that he swipes over the edges from time to time. All I’m going to say is that you really, really need to spend an extra few quid on a sidewall planer. And you need to use it, at least once per edge. Just sayin’…

Weekly round up

In between the snowy weather and my recurring trips away from Aberdeen it’s all been a bit hectic and taking photos tends to be the first thing that is cut when it’s getting frantic. So I was pleased to see that I did remember to take a couple of snaps of things that caught my eye.

Brian’s F1 Rip’n’Wuds:

Brian bought these very expensive skis on a whim on holiday last season but felt they were a little bit flexy underfoot so he scoured the dark web for someone who could supply a couple of plates of woven carbon fibre. Our favourite tech guru Jon Coster at the Piste Office fitted them for Brian. To be honest it doesn’t really matter if they make any difference to the handling, the plates look gorgeous.

I can’t even remember what brand these skies were, but this comedy whisker of white P-tex cheered me up as I tried to sort out the rest of the base which had been sanded at some point in the past as part of an in-resort service. Sanding P-tex always results in fur on the base which is a pain in the neck to remove, so if you’re ever tempted to try it please don’t. The skis came up quite nicely in the end but I forgot to get the phone out for the “after” picture:


Lesley brought a load of equipment in for a service and all was going well until the edges on her Dynastars were subject to inspection. You can see on the left that the edges were waving in & out a bit. I sometimes wonder if there’s a ski servicing tool that is actually designed to leave this hopeless finish. Anyway it left the edge significantly hardened, and once through the hardening it became clear that the edge was less than one degree:

If the bottom of the edge (side nearer the base) doesn’t get touched by the file in a one degree edge guide then the edge must be less than one degree. You can see the dark strip next to the base bevel in this photo. Again, who knows what the last guy thought he was doing or if he applies any sort of quality assurance to the equipment before it goes out the door. Anyway, loads of elbow grease later the edge looked as its creator intended it to – straight, shiny and one degree all the way along:

Sadly another pair of the skis Lesley dropped off had suffered the same treatment. Not only is is a drag for me to break through the hardening – the first edge alone took 25 minutes to get back to a decent state – it means I have to take off more steel than I want to get back to the proper bevel. Anyway, they should be much better to use now.

Finally, these three boards were dropped off in varying states of wear. They all left in good shape, although Aidan’s Salomon has been “repaired” by someone with a black P-Tex drip candle in the past which has left it streaked with black as though it had been attacked with a sharpie.

I’m really not a fan of drip candles as you can’t warm the base first, the P-tex is extra soft and the person applying the P-tex gets lungfuls of toxic smoke. When you need to repair over an old drip candle repair the candle P-tex will start to boil before the decent quality, stiffer, higher melt point stuff techs use is even melted, which makes getting a good repair a pain in the neck. Apart from that, all three boards had good flat bases and came up very nicely. Tor’s Nitro is a lovely piece of kit, except for the silver foil that they decided would look good on the base but doesn’t make repairing scratches any easier.

That’s it for now, more entries when I’m back from my travels on 26th March.

Eddie’s Basic (again)

Eddie dropped off his Yes Basic for a repair recently, then spent about 30 milliseconds riding at Nevis range before yanking some more plastic:

Ouch

So we’re down to the tabs on the edge here, usually better left inside the board.  Nothing too serious, but we’re working with coloured base P-tex rather than sensible old black, so whatever we do is going to look a bit rubbish – rather like someone getting a burn and needing a skin graft, looks OK unless you have a tattoo in the area of interest.

Anyway as we’re down to the metal we need to weld in some clear & colourless metal-grip followed by some clear & colourless P-tex on top – metal-grip doesn’t grab wax worth a damn. Let’s face  it clear P-tex repairs always look horrible as you can gaze right into the heart of the board:

I’d finished the repair & waxed the board up before I realised that I actually have a lime green P-tex repair strip lurking in the bottom of the repairs bucket. However, based on recent statistics it will only be a few days before Eddie is back at the door with more eye-watering damage to the board – we’ll get it next time.

It was interesting to see how the previous repair is holding up – pretty well if I say so myself. A tiny strip of Araldite has dropped out, but that’s better replaced with more flexible P-tex anyway:


Looking good despite the bashing the rest of the board has received

Colin again

Colin was my first customer and has probably been the most loyal with various sets of skis coming through the shop and plenty of recommendations to his mates.

One thing I really like about Colin is that fact that, despite spending the sort of money on skis and bindings that could buy you a flat in Torry, he’s not frightened to ski the nuts off his kit. Naturally that leads to a few minor dings:

But fear not, DPS know a thing or two about skis and use rufty-tutfy P-tex, probably 7200 or higher, if it exists. So while that means the repair P-tex takes a while to weld in, it also means it’s staying there for good. You just need to remember that there isn’t really anywhere for excess heat to go on these super lightweight carbon fibre skis so be vigilant.

Heavy P-tex repairs 

DPS are the only people I know who hand-tune skis at the factory, which makes tuning them an absolute breeze. Like most manufacturers they’ve parted company with stainless edges, so even if the edges are worse for wear you can get them back in shape fairly easily without wearing out all your files. They even cut back the sidewall polythene above the steel edges so that your overworked local tech doesn’t need to do it himself.

It goes without saying that the bases are perfectly flat and, despite the very thin skis there’s no “pull through” of binding  screws. Unlike half the snowboards I see that have “wax wells” under the bindings…

So it’s the same old story – you can have as much fun on your Decathlon skis as Colin has on his DPSs – they’re only a bit heavier, and a bit softer, and a bit more flexi – but you won’t have the feeling of innate superiority as you pile out of the chopper into the unknown…

Martin’s Scottish Board and porridge for breakfast

Martin picked up his heavily scored K2 after it had received the fill, scrape, structure, edge & wax treatment – after on the left, before on the right…


Then when he picked up his “Scottish Board” he dropped off a rather nice Never Summer board for some TLC. More on that in another blog post sometime.
The other board in the after picture was caked in ?wax? when it was dropped off. Jon was so embarrassed by the white base and mysterious chemical coating that he told me he was dropping it off “for a friend”. Aye, right…

Anyway, once the base goo was scraped off it turned out that the edges had been tuned by hand at some point which made redoing the edges a pleasure rather than a trial, which goes to show you shouldn’t judge a board by its base.

Ally’s full house

Alasdair has done the sums and realised that paying someone to service a house full of skis only makes sense if you’re a Russian oligarch. So he called up looking for a lesson.

Full house, of skis, dewaxing

Sadly he came up against the new ManCave hard line on lessons – you have to have the skis tuned by me first before turning up for a lesson. There’s a good reason for this – if you’ve had skis machine serviced and the edges are all over the place & case hardened too then chances are the lesson involves watching me wrestling and swearing for thirty minutes before you get to do anything.

So in some ways it was a relief to find that Ally’s Atomics complied pretty well with the usual horror story. Regular readers will know that all Atomics leave the factory with 1 degree base bevels & 3 degree side bevels, sharp to the tips. Readers may also have spotted that production line servicing outlets tend not to change their angles between skis, so there’s a tendency for all the skis to come out the same. Ally reckoned that he’s had the skis seen to twice, in different resorts. One edge had a nice break of slope, indicating that the first “service” had taken the side edge down from 3 degrees to 2 degrees. At least that guy had finished the job – the following effort had tried to give the edge a one degree bevel, but gave up before the whole edge was finished. It was obvious before even starting as the rust looked different on the two faces and there was a clear line between the two.

So, that took a bit of sorting out. The other edge on the same ski had something very odd – the edge was more than 3 degrees. That means that the first pass with the file in a 3 degree guide only took metal off the part of the edge nearest the base. It’s so unusual that I spent 5 minutes checking that the file guide wasn’t bent or the file somehow sitting wrong. Definitely the edge and not me, so more wrestling and swearing to bring it back to three degrees. The other ski was similarly out of spec and the edges well hardened. I didn’t mention earlier that the skis also had the common Atomic issue of concave bases, so I spent some time flattening , filling & structuring the bases before getting onto the edges. So the single pair of skis consumed a lot of time before they were even ready to be waxed.

The rest of the family planks were less abused and didn’t take too long to get back to manufacturer’s specs, then two coats of wax for everyone and polish to a high shine. Here they are waiting to be picked up:

So the point I started to make at the top of the blog is that it’s better to learn ski servicing on sorted skis than it is to watch me beat them into submission for an hour. Ally just needs to ski the wax off these for a week or two then he can come back and be inducted into the dark arts of the ski tech in a sensible amount of time, then he can start saving a (small) fortune on tuning costs, with the added satisfaction of knowing he’ll have the same bevels on both edges of his skis…